

This tutorial guides you through the process of enabling Bridge Mode on the Hathway-provided RH821GWV-DG router, allowing it to pass the internet connection directly to another router without performing Network Address Translation (NAT). This is useful if you want to use your own router for enhanced features or performance. We'll use the router's admin panel and browser developer tools to bypass ISP restrictions.
Prerequisites:
Important Notes:
---
Step 0: Access the Admin Panel
- Password: The router’s MAC address in uppercase without spaces (e.g.,
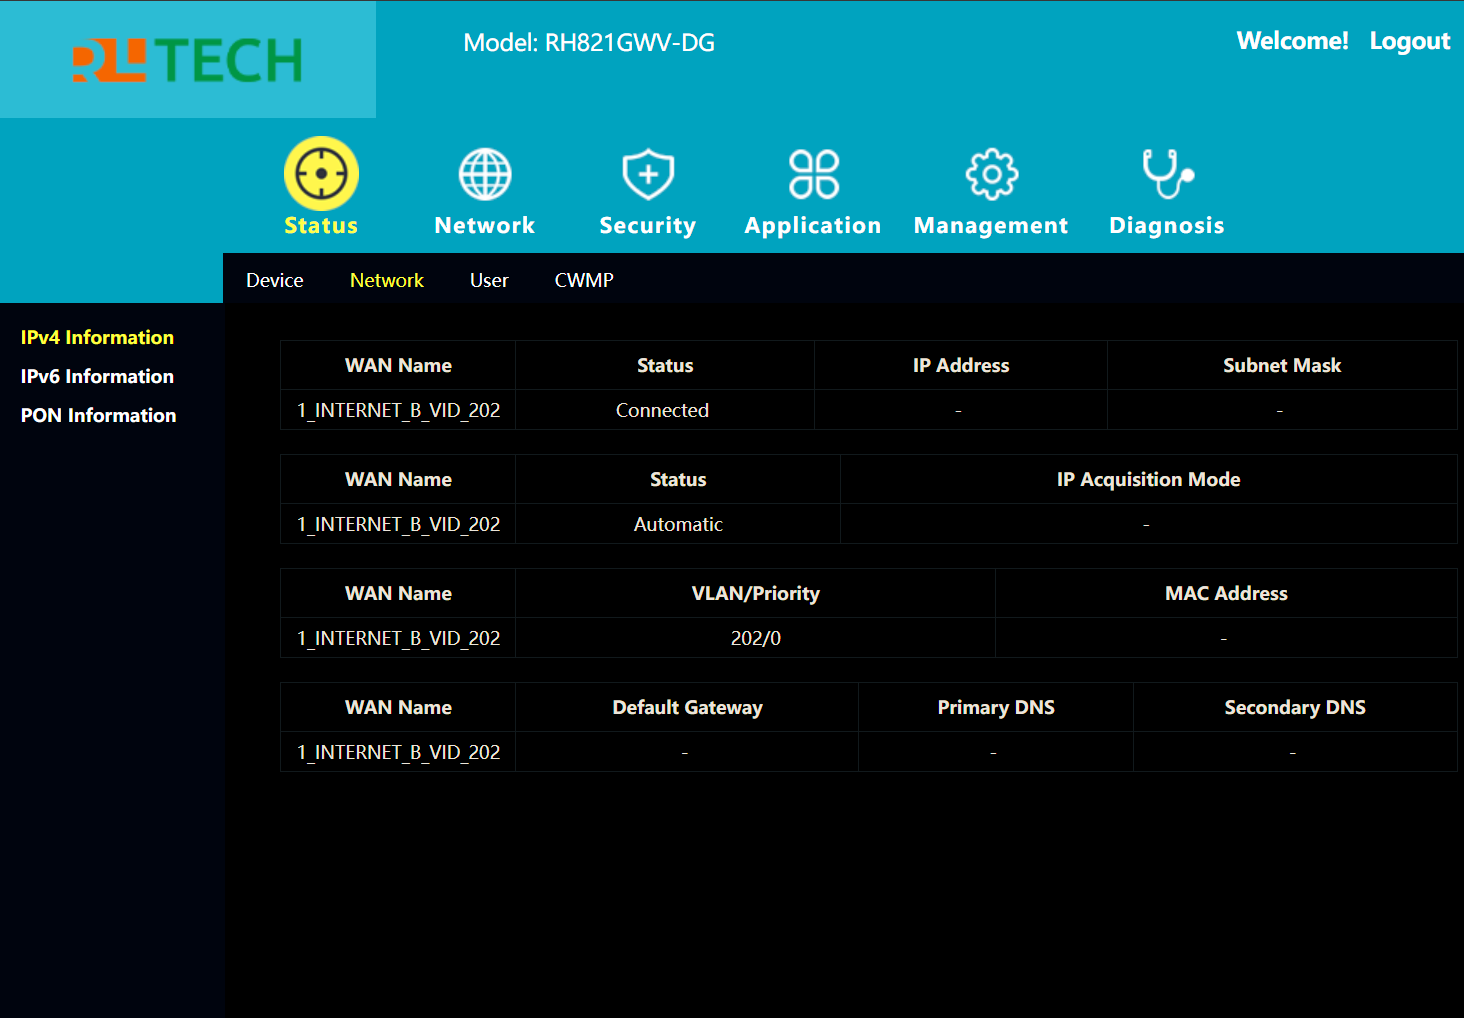
Step 1: Verify the Status Page
- If multiple connections are listed, note the primary one (usually marked "Connected") for modification.
Step 2: Navigate to the Network Tab
- Click the Network tab, identified by a globe icon, in the top navigation menu.
Step 3: Check the Current Interface
Step 4: Identify the Disabled Mode Option
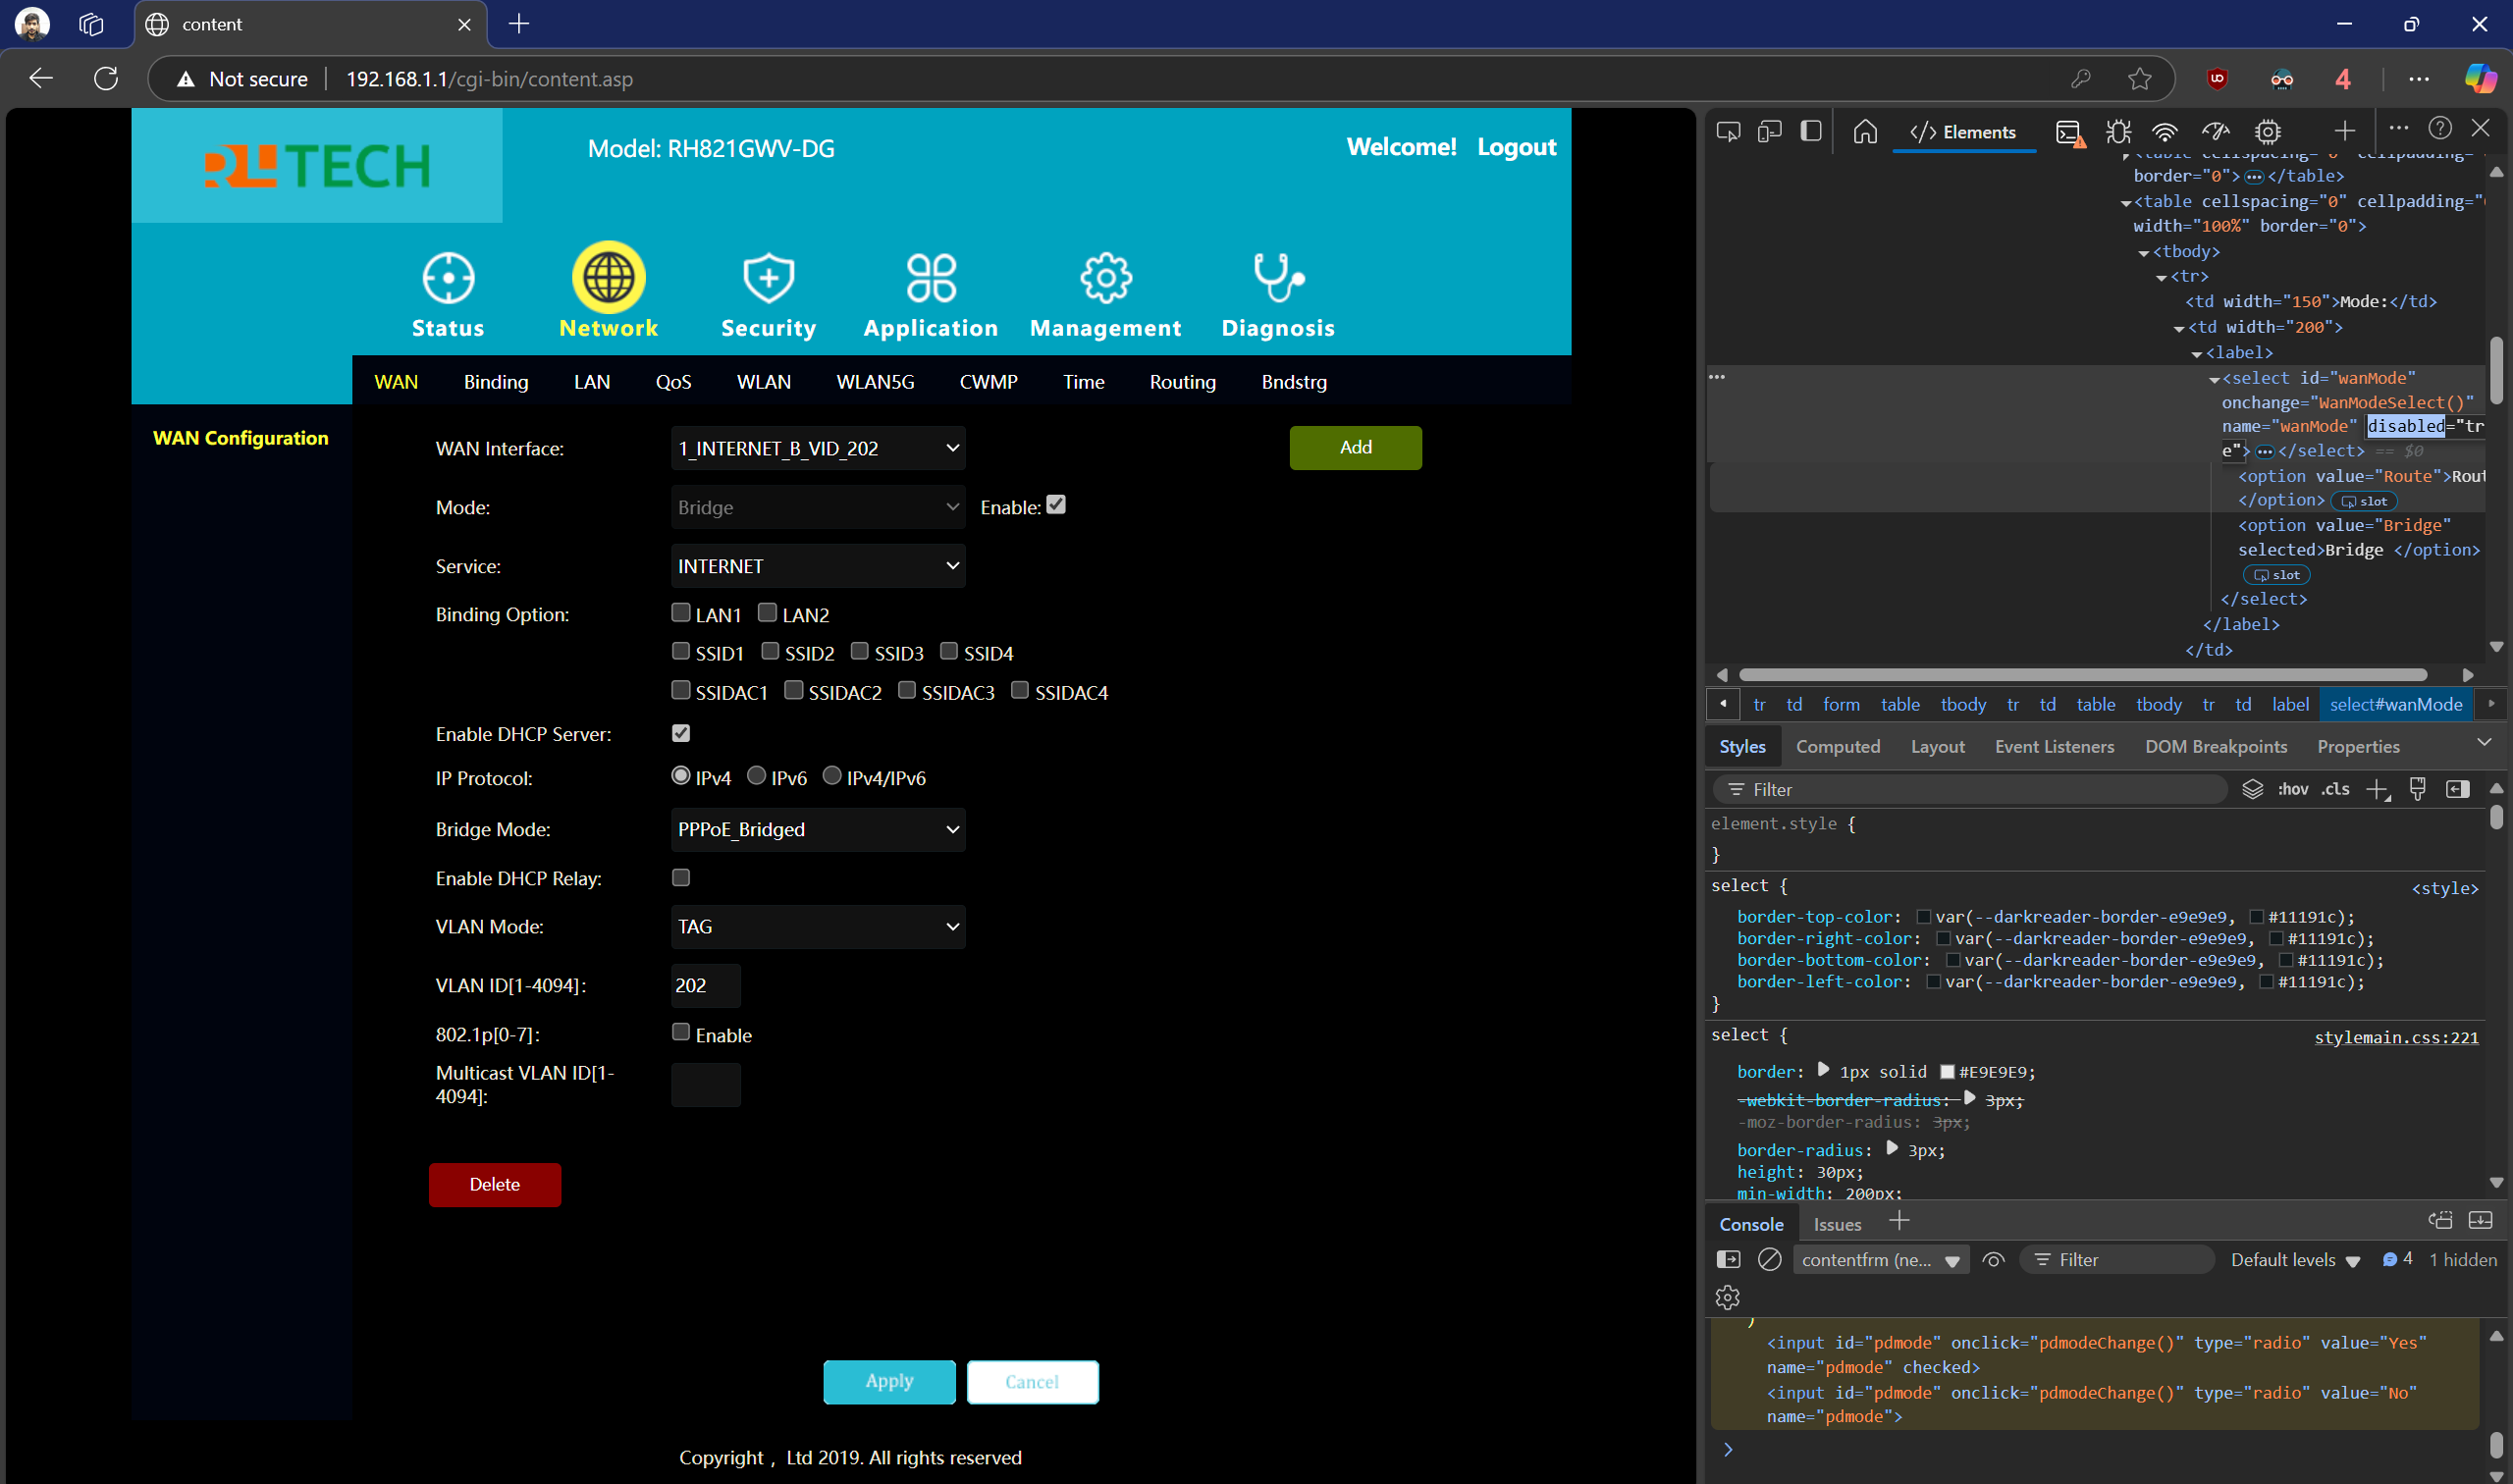
- On the WAN configuration page, locate the Mode dropdown. It will likely be faded out (disabled) due to ISP restrictions, preventing you from changing it directly.
- Reference: Screenshot shows the Mode dropdown grayed out, indicating it’s disabled in the previous Screenshot.
Step 5: Enable the Mode Dropdown Using Inspect Element
- Remove the
- After editing:
Step 6: Delete the PPPoE Connection
- In the developer tools, search for an element like
- If it has a
- Reference: Screenshot 134708 shows the Delete button’s element in the developer tools.
Step 7: Configure PPPoE on Your Own Router
- Obtain PPPoE Credentials:
- Return to the Hathway router’s WAN configuration page (before deleting the PPPoE connection, if possible).
- Locate the Username and Password fields.
- Right-click each field and select Inspect to reveal the values in the
- Note down the username and password.
- Set Up PPPoE on Your Router:
- Access your own router’s admin panel (refer to its manual for the IP address, e.g.,
- Navigate to the WAN or Internet settings.
- Select PPPoE as the connection type.
- Enter the Username and Password from the Hathway router.
- Set the Service Name to
- If applicable, set the VLAN ID to
- Save and apply the settings.
- Test the internet connection on your router.
Step 8: Special Case for Unifi Dream Machine Special Edition (Optional)

- Modify the PPPoE configuration to include the
- After enabling, configure the PPPoE settings as in Step 7.
---
Additional Notes
- Verify the PPPoE credentials.
- Restart both the Hathway router and your own router.
---
Summary
By following these steps, you’ll enable Bridge Mode on your Hathway RH821GWV-DG router and configure your own router to handle the PPPoE connection. This setup leverages your router’s capabilities while using the Hathway device as a bridge. For further details on the router, refer to the official manual.
Prerequisites:
- Access to the router's admin panel at
192.168.1.1. - Username:
admin - Password: The router's MAC address in uppercase without spaces (e.g.,
AABBCCDDEEFF). Check the sticker on the router for the MAC address. - A web browser with developer tools (e.g., Google Chrome, Firefox).
- Basic familiarity with using browser developer tools (Inspect Element).
Important Notes:
- Changes made via Inspect Element are temporary and only affect the current browser session. You must save settings through the admin panel to make them permanent.
- After enabling Bridge Mode, the Hathway router will no longer provide Wi-Fi or routing functions; your own router will handle these tasks.
---
Step 0: Access the Admin Panel
- Open a web browser and navigate to
192.168.1.1. - Log in using:
admin- Password: The router’s MAC address in uppercase without spaces (e.g.,
AABBCCDDEEFF), found on the router’s sticker.Step 1: Verify the Status Page
- After logging in, go to the Status tab (it may have a target or signal icon).
- Confirm that only one WAN connection exists, such as
1_INTERNET_B_VID_202. This is the connection you’ll modify for Bridge Mode.
1_INTERNET_B_VID_202 and a "Connected" status.- If multiple connections are listed, note the primary one (usually marked "Connected") for modification.
Step 2: Navigate to the Network Tab
- Click the Network tab, identified by a globe icon, in the top navigation menu.
Step 3: Check the Current Interface
- In the left sidebar, select WAN to open the WAN configuration page.
- The interface will show a WAN connection (e.g.,
1_INTERNET_B_VID_202) with the Mode dropdown set to Route. This indicates the router is currently in routing mode, not Bridge Mode.
Step 4: Identify the Disabled Mode Option
- On the WAN configuration page, locate the Mode dropdown. It will likely be faded out (disabled) due to ISP restrictions, preventing you from changing it directly.
- Reference: Screenshot shows the Mode dropdown grayed out, indicating it’s disabled in the previous Screenshot.
Step 5: Enable the Mode Dropdown Using Inspect Element
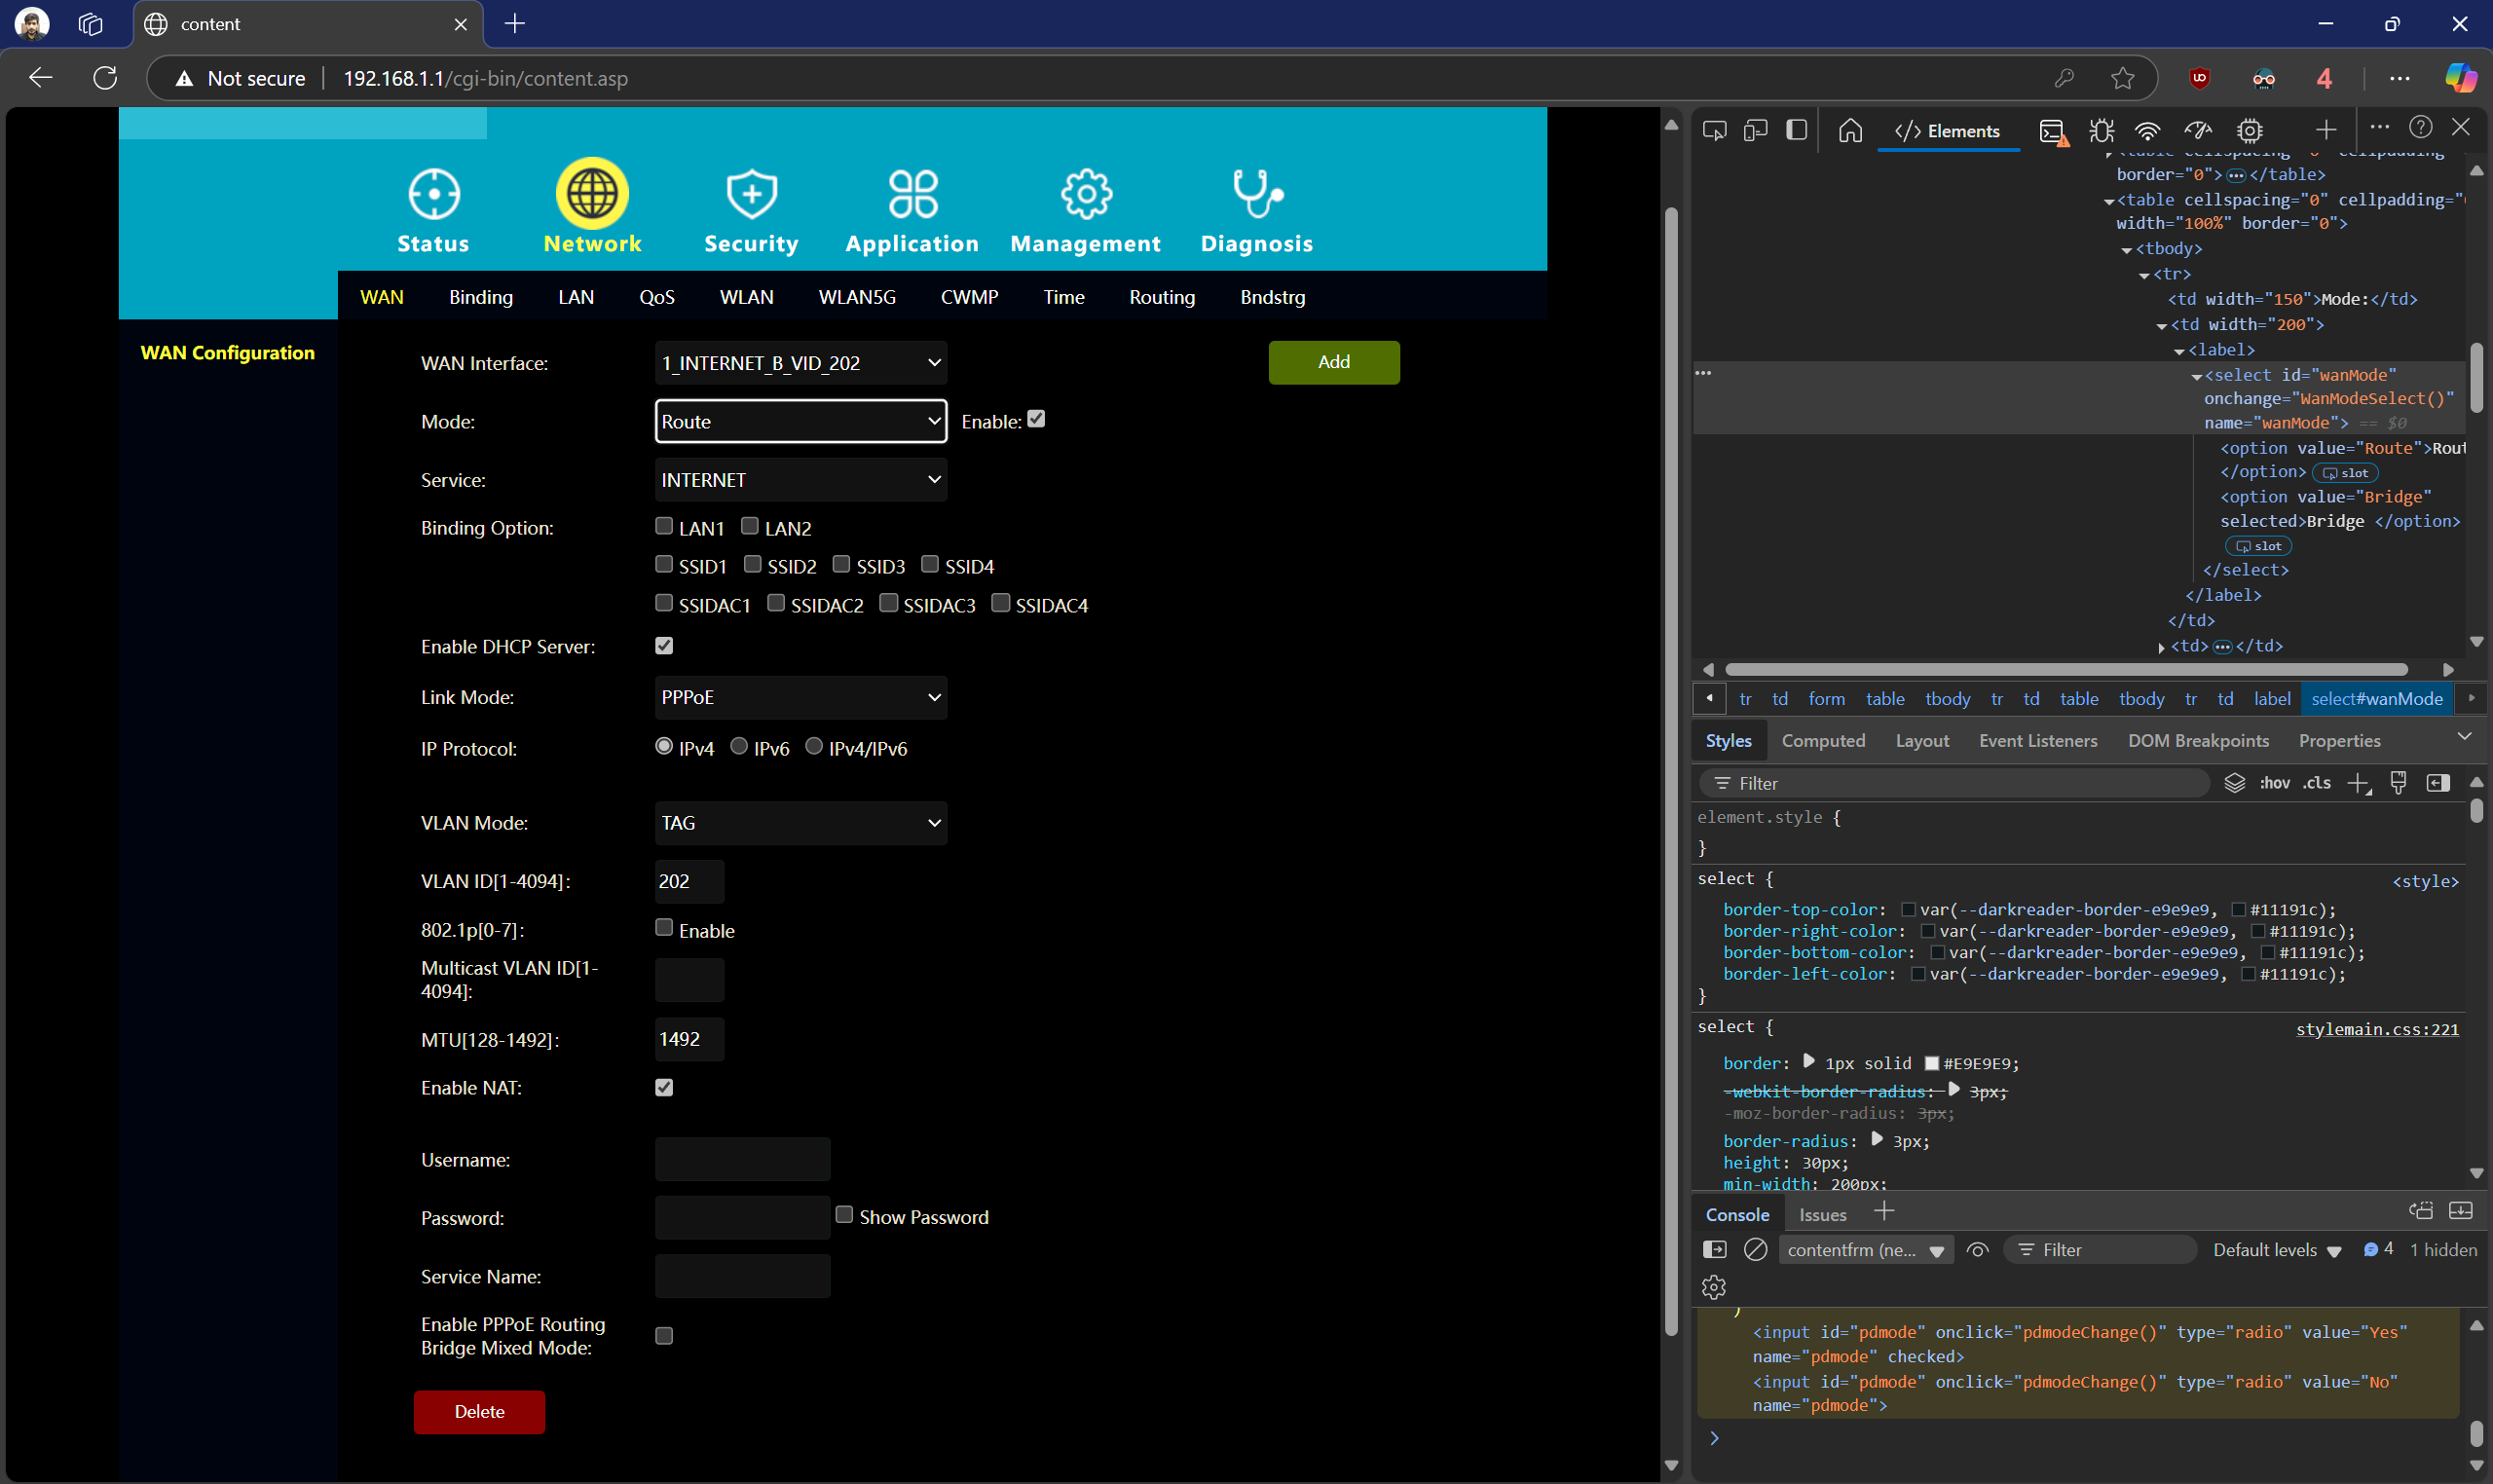
- Right-click the Mode dropdown and select Inspect (or press F12) to open the browser’s developer tools.
- In the developer tools, find the
<select>element for the Mode dropdown (it may have an ID likewanMode).
<select id="wanMode" disabled>- Remove the
disabled attribute by deleting the word disabled from the <select> tag.- After editing:
<select id="wanMode">- Close the developer tools. The Mode dropdown should now be clickable.
- Change the Mode to Bridge from the dropdown.
- Click Apply or Save at the bottom of the page to save the changes.
Step 6: Delete the PPPoE Connection
- If a PPPoE connection exists on the WAN page, you need to delete it after setting Bridge Mode.
- Look for a Delete button. If it’s hidden (not visible), enable it using Inspect Element:
- In the developer tools, search for an element like
<input id="btnRemoveCnt" type="button" value="Delete" class="btnDel">.- If it has a
style attribute like display: none;, change it to display: block; or remove the style to make the button visible.- Reference: Screenshot 134708 shows the Delete button’s element in the developer tools.
- Once visible, click Delete to remove the PPPoE connection.
- Click Apply or Save to confirm the deletion.
Step 7: Configure PPPoE on Your Own Router
- Obtain PPPoE Credentials:
- Return to the Hathway router’s WAN configuration page (before deleting the PPPoE connection, if possible).
- Locate the Username and Password fields.
- Right-click each field and select Inspect to reveal the values in the
<input> elements (e.g., <input type="text" value="your_username">).- Note down the username and password.
- Set Up PPPoE on Your Router:
- Access your own router’s admin panel (refer to its manual for the IP address, e.g.,
192.168.0.1).- Navigate to the WAN or Internet settings.
- Select PPPoE as the connection type.
- Enter the Username and Password from the Hathway router.
- Set the Service Name to
HATHWAY (all caps). This is critical for a successful connection.- If applicable, set the VLAN ID to
202 (based on the WAN connection name 1_INTERNET_B_VID_202).- Save and apply the settings.
- Test the internet connection on your router.
Step 8: Special Case for Unifi Dream Machine Special Edition (Optional)
- If using a Unifi Dream Machine Special Edition (UDM-SE), it may not support the Service Name parameter by default.
- Follow this Reddit tutorial to enable it via Command Line Interface (CLI):
- Modify the PPPoE configuration to include the
HATHWAY service name.- After enabling, configure the PPPoE settings as in Step 7.
---
Additional Notes
- VLAN Configuration: If your connection requires a VLAN ID (e.g.,
202), ensure it’s set correctly on your own router’s WAN settings. - Saving Changes: Always click Apply or Save in the admin panel after making changes to ensure they persist after a reboot.
- Troubleshooting: If the internet doesn’t work after setup:
HATHWAY) and VLAN ID (202).- Verify the PPPoE credentials.
- Restart both the Hathway router and your own router.
---
Summary
By following these steps, you’ll enable Bridge Mode on your Hathway RH821GWV-DG router and configure your own router to handle the PPPoE connection. This setup leverages your router’s capabilities while using the Hathway device as a bridge. For further details on the router, refer to the official manual.


